NETRESEC Network Security Blog - Tag : Windows

rss Google News

PolarProxy in Windows Sandbox

In this video I demonstrate how PolarProxy can be run in a Windows Sandbox to intercept and decrypt outgoing TLS communication. This setup can be used to inspect otherwise encrypted traffic from malware or suspicious Windows applications, which communicate over HTTPS or some other TLS encrypted protocol.

The Windows Sandbox WSB file used in the demo can be downloaded from here: https://www.netresec.com/?download=PolarProxySandbox

Note: Windows Pro or Enterprise is required to run WSB files

Parsing Decrypted TLS Traffic with NetworkMiner

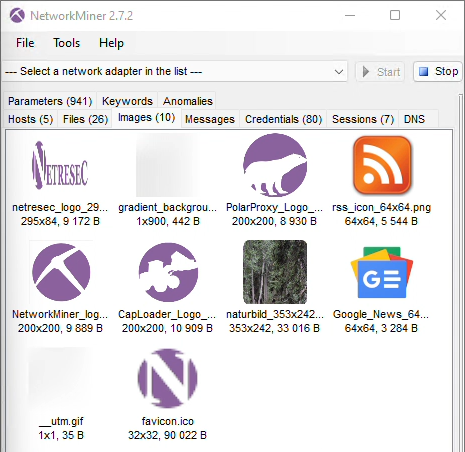
This sandbox also includes NetworkMiner, primarily because it can be used to read a real-time PCAP-over-IP stream with decrypted traffic from PolarProxy. As shown in the video, this feature can be used in order to extract files, images or parameters from the decrypted TLS traffic in near real-time.

Images extracted from decrypted HTTP/2 traffic shown in NetworkMiner

For more info about how to run NetworkMiner in Windows Sandbox, please see our blog post Running NetworkMiner in Windows Sandbox.

Configuring a Proxy Server in Windows Sandbox

Windows’ built-in proxy settings are unfortunately not available in Windows Sandbox, which is why I installed a third-party proxy client that redirects all outgoing network traffic to PolarProxy’s SOCKS server. I used Proxifier in the video, which has the additional benefit of being able to redirect all traffic to the proxy, even from applications that aren’t proxy aware. This feature is crucial when attempting to intercept and decrypt TLS traffic from malware that doesn’t respect the proxy settings configured in the operating system.

Command Log

Start PolarProxy with a PCAP-over-IP listener on TCP 57012, SOCKS server on TCP 1080, HTTP proxy on 8080 and a transparent TLS proxy on port 443:

PolarProxy --pcapoverip 57012 -x ..\proxyroot.cer --socks 1080 --httpconnect 8080 --nontls allow -p 443,80

Test PolarProxy’s SOCKS server by sending an unencrypted HTTP request through the proxy:

curl --socks4 localhost http://www.netresec.com

Test PolarProxy’s SOCKS server by sending an HTTPS request through the proxy:

curl --insecure --socks4 localhost https://www.netresec.com

Test PolarProxy’s HTTP CONNECT proxy server by sending an HTTPS request through the proxy:

curl --insecure --proxy localhost:8080 https://www.netresec.com

Start Menu Search

As shown in the video, text typed into Windows’ start menu gets sent to Microsoft. For more information about this behavior, and how it can be disabled, check out our Start Menu Search video and blog post.

Posted by Erik Hjelmvik on Monday, 31 January 2022 09:50:00 (UTC/GMT)

Tags: #PolarProxy#NetworkMiner#SOCKS#proxy#Windows Sandbox#Sandbox#PCAP-over-IP#pcapoverip#Windows#TLS#HTTPS

Share: Facebook   Twitter   Reddit   Hacker News Short URL: https://netresec.com/?b=221d46b


PolarProxy 0.9 Released

PolarProxy 0.9

PolarProxy was previously designed to only run as a transparent TLS proxy. But due to popular demand we’ve now extended PolarProxy to also include a SOCKS proxy and a HTTP CONNECT proxy. PolarProxy automatically decrypts all proxied SSL and TLS traffic, regardless if the remote server is running on TCP 443 or some other port, as long as the traffic passes through PolarProxy. As from now we also release a Windows build of PolarProxy, alongside the Linux x64, ARM and ARM64 builds.

SOCKS Proxy

Use the command line argument “--socks [port]” to start PolarProxy’s SOCKS proxy server. This SOCKS proxy supports multiple versions of the SOCKS protocol, including SOCKS 4, SOCKS 4a, SOCKS 5 and SOCKS 5h.

As an example, the command below starts a SOCKS server on TCP port 1080 and passes a copy of the decrypted TLS traffic as a PCAP stream to tshark.

PolarProxy --socks 1080 -w - | tshark -r - -d tcp.port==443,http2
Note: The “-d tcp.port==443,http2” argument in the command above is used to tell tshark to parse traffic to port 443 as HTTP/2 instead of TLS. An alternative method would be to instead configure PolarProxy to output decrypted 443 traffic as if it was port 80, by supplying the “-p 443,80” argument to PolarProxy.

You can then use curl to run some HTTPS traffic through the SOCKS proxy:

curl --insecure --socks4 localhost https://www.netresec.com

After doing this you should see the decrypted HTTP/2 traffic in tshark’s output.

HTTP CONNECT Proxy

We’ve also added a HTTP proxy to PolarProxy 0.9, but it only supports the CONNECT request method. This means that normal unencrypted HTTP requests, like GET or POST requests, will be rejected by PolarProxy. Most web traffic is TLS encrypted nowadays anyway, so we don't consider this limitation to be a big issue.

The HTTP CONNECT proxy service is activated with the “--httpconnect” argument. Decrypted TLS traffic from PolarProxy’s HTTP CONNECT proxy can be forwarded to tshark just like in the SOCKS example, but the traffic from these proxies can also be accessed through PCAP-over-IP like this:

PolarProxy --httpconnect 8080 -p 443,80 --pcapoverip 57012

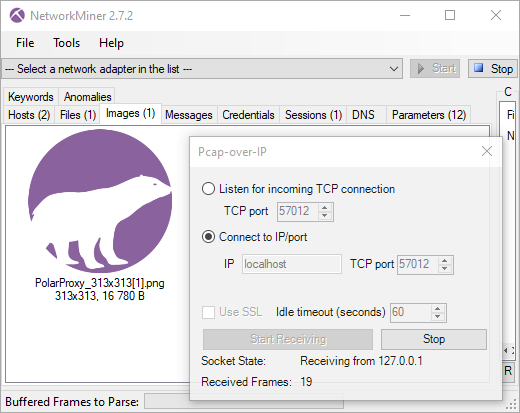
You can then connect to PolarProxy’s PCAP-over-IP service with NetworkMiner by clicking File, Receive PCAP over IP, select “Connect to IP/port”, enter “localhost” and click the “Start Receiving” button. You’ll now be able to see a real-time feed of all the traffic that PolarProxy decrypts. As an example, let’s download the PolarProxy logo over HTTPS to see if NetworkMiner can extract it from PolarProxy’s decrypted PCAP-over-IP stream:

curl --insecure --proxy localhost:8080 https://www.netresec.com/images/PolarProxy_313x313.png

The PolarProxy logo immediately shows up in NetworkMiner’s images tab:

NetworkMiner reading PCAP-over-IP from PolarProxy

Port-Independent TLS Protocol Detection

When PolarProxy is running as a transparent TLS proxy all incoming traffic can be expected to be TLS. But that’s not the case when, for example, PolarProxy is running as a SOCKS proxy. We have therefore added port-independent TLS protocol detection for proxied traffic, so that TLS traffic can be detected and decrypted even when it runs on other ports than the standard 443, 465, 853, 990, 993, 995 and 5061 ones.

There is one crucial limitation to the automatic SSL/TLS protocol detection though, it doesn’t support explicit TLS traffic that relies on opportunistic encryption features like STARTTLS, which bootstraps TLS into an already established application layer session.

Allow Non-TLS Traffic

SOCKS and HTTP CONNECT proxies can both be used to transport other protocols than TLS. PolarProxy blocks all non-TLS traffic by default, but this setting can be overridden with the “--nontls allow” argument to allow any traffic to be proxied. The allow non-TLS override has no effect on PolarProxy’s transparent proxy though, because it will need to see a valid SNI field in order to know whereto the traffic should be forwarded.

Windows Build

There wasn’t much need for a Windows build of PolarProxy prior to the release of version 0.9, because the Windows firewall can’t be configured to redirect outgoing port 443 traffic to a local service. However, now that PolarProxy also includes SOCKS and HTTP CONNECT services, the situation is completely different. There are many ways to configure a Windows PC, as well as web browsers and other applications, to use a local proxy server.

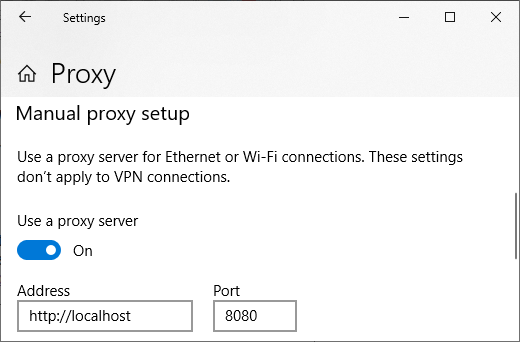
You can use the Proxy settings window in Windows 10 and 11 to enable a local HTTP proxy like this:

Windows 10 Proxy Settings

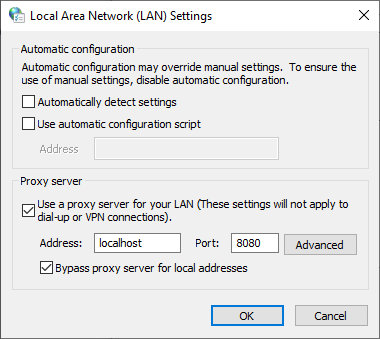
Another option is to run “inetcpl.cpl” (Internet Options), open the “Connections” tab and click the “LAN settings” button to configure an HTTP proxy.

Windows Internet Options LAN Proxy Settings

You can, of course, also configure your browser to use a local SOCKS or HTTP proxy in Windows, just as you’d do on any other operating system.

But don’t forget to configure your OS and/or browser to trust your PolarProxy instance’s root CA certificate first, as explained in the “Trusting the PolarProxy root CA” section of our PolarProxy documentation.

The Windows version of PolarProxy is a .NET framework-dependent application, which requires the .NET 6 runtime to be installed. The PolarProxy releases for other platforms (Linux x64, ARM and ARM64) are all self-contained applications, which are published with the .NET runtime built-in.

Visit our PolarProxy page to download and install PolarProxy.

Posted by Erik Hjelmvik on Thursday, 13 January 2022 10:15:00 (UTC/GMT)

Tags: #PolarProxy#proxy#SOCKS#SOCKS5#TLS#SSL#decrypt#Windows#PCAP-over-IP#pcapoverip

Share: Facebook   Twitter   Reddit   Hacker News Short URL: https://netresec.com/?b=221953b


Open .ETL Files with NetworkMiner and CapLoader

NetTrace.ETL in CapLoader 1.9.3 and NetworkMiner 2.7.2

Windows event tracing .etl files can now be read by NetworkMiner and CapLoader without having to first convert them to .pcap or .pcapng. The ETL support is included in NetworkMiner 2.7.2 and CapLoader 1.9.3, which were both released this morning.

What is an ETL Trace File?

ETL is short for Event Trace Log, which is ETW session data that has been logged to a file. You can, for example, extract EVTX logs from ETL files. But in this blog post we're gonna focus on network traffic that has been captured to an ETL file with a command like:

netsh trace start capture=yes report=no tracefile=packets.etl
...wait while packets are being captured...
netsh trace stop

Pro-tip: You can specify a capture NIC explicitly with "CaptureInterface=<GUID>"

NetworkMiner and CapLoader can also read packets in Pktmon ETL files, which actually are different from those created with netsh. Capturing packets to an ETL file with Pktmon is very simple:

pktmon start --capture --pkt-size 0 -f packets.etl
...wait while packets are being captured...
pktmon stop

Pro-tip: You can specify capture filters with "pktmon filter add"

You can also capture packets to ETL files with PowerShell:

New-NetEventSession -Name sniffer -LocalFilePath C:\packets.etl
Add-NetEventPacketCaptureProvider -SessionName sniffer -TruncationLength 2000
Start-NetEventSession -Name sniffer
...wait while packets are being captured...
Stop-NetEventSession -Name sniffer
Remove-NetEventSession -Name sniffer

Pro-tip: You capture packets on a remote PC by specifying a CimSession

Advantages

The built-in support for ETL files in NetworkMiner and CapLoader makes it easy to work with ETL files. Not only will you no longer need to go through the extra step of converting the ETL file to PCAP using etl2pcapng or Microsoft Message Analyzer (which was retired in 2019), the analysis will also be faster because both CapLoader and NetworkMiner read ETL files faster compared to etl2pcapng and MMA.

Limitations

The primary limitation with NetworkMiner and CapLoader's ETL support is that it only works in Windows. This means that you will not be able to open ETL files when running NetworkMiner in Linux or macOS.

Another limitation is that both NetworkMiner and CapLoader might fail to parse logged packets if the event trace was created on an OS version with an event manifest that is incompatible with the OS version on which the ETL file is opened.

Under the Hood

Both NetworkMiner and CapLoader leverage Windows specific API calls to read packets from ETL files. An ETL file opened in CapLoader first get converted to PcapNG, then CapLoader parses that PcapNG file. NetworkMiner, on the other hand, parses the packets in the ETL file directly to extract artifacts like files, images and parameters. NetworkMiner's approach is both simpler and quicker, but by converting the ETL file to PcapNG CapLoader can utilize its packet indexing feature to rapidly extract any subset of the captured traffic upon request by the user.

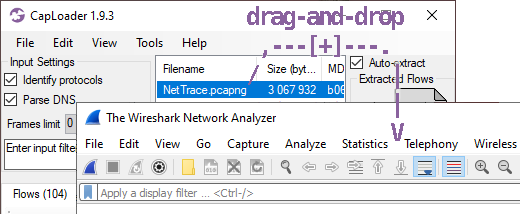
CapLoader's approach is also useful for users who are wondering how to open ETL files in Wireshark, since the packets from an ETL file can be opened in Wireshark by dragging the PcapNG file from the CapLoader GUI onto Wireshark.

Drag-and-drop NetTrace.pcapng from CapLoader to Wireshark
Image: NetTrace.etl converted to PcapNG in CapLoader can be drag-and-dropped onto Wireshark.

Additional Updates in NetworkMiner

The ETL support is not the only new feature in NetworkMiner 2.7.2 though. We have also added support for the ERSPAN protocol. The FTP parser has also been improved to support additional commands, such as AUTH (RFC2228).

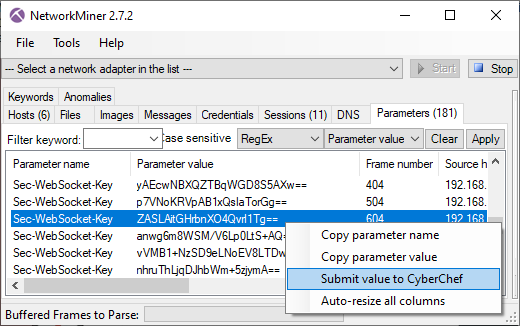
We've also added a useful little feature to the context menu of the Parameter's tab, which allows users to send extracted parameters to CyberChef (on gchq.github.io) for decoding.

Submit Parameter value from NetworkMiner to CyberChef
Image: Right-clicking a parameter brings up a context menu with "Submit to CyberChef" option.

Additional Updates in CapLoader

The only major improvement in CapLoader 1.9.3, apart from the built-in ETL-to-PcapNG converter, is that the protocol identification speed and precision has been improved. We've also separated the identification of SSL (version 2.0 to 3.0) and TLS (SSL 3.1 and later) as two separate protocols in this version, whereas they previously both were fingerprinted as "SSL".

Credits

We'd like to thank Dick Svensson and Glenn Larsson for their input on reading ETL files. We also want to thank Markus Schewe for recommending us to add ERSPAN support to NetworkMiner!

Posted by Erik Hjelmvik on Tuesday, 02 November 2021 07:15:00 (UTC/GMT)

Tags: #PowerShell#CapLoader#NetworkMiner#PcapNG#Windows#Wireshark#PCAP#CyberChef

Share: Facebook   Twitter   Reddit   Hacker News Short URL: https://netresec.com/?b=21B0d0e


Running NetworkMiner in Windows Sandbox

NetworkMiner can be run in a highly efficient Windows Sandbox in order to analyze malicious PCAP files in Windows without accidentally infecting your Windows PC. This blog post shows how to set up a Windows Sandbox that always boots up a fresh install of Windows 10 with the latest version of NetworkMiner installed.

I generally recommend analyzing Windows malware in Linux, or some other non-Windows environment, in order to avoid accidentally infecting yourself (NetworkMiner runs fine in Linux btw). Nevertheless, I still often find myself loading capture files containing malicious network traffic into CapLoader and NetworkMiner under Windows. I have previously demonstrated that this can be a quick and crude way to perform an anti virus scan of files contained in a pcap file.

Windows Sandbox

If you want to analyze malicious traffic in Windows with minimal risk of infecting yourself then you should definitely check out Microsoft’s Windows Sandbox (available in Windows 10 Pro and Enterprise editions). The Windows Sandbox is using Windows containers, so it’s very efficient compared to spinning up a full Windows VM. It also provides features like kernel isolation, so that the sandbox container doesn’t use the same kernel as the host, and ensures that a new Windows environment is created every time the sandbox is run. Windows Sandbox also doesn't run any anti-virus, so it won't interfere with the extraction of malicious contents from within the analyzed capture files.

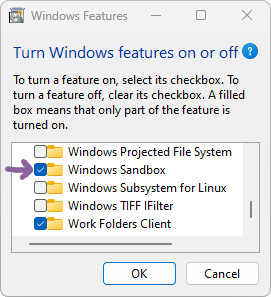
Optional Features, Windows Sandbox Follow these steps to install Windows Sandbox:
  1. Run OptionalFeatures.exe, aka “Turn Windows features on or off”
  2. Enable the “Windows Sandbox” feature (check the box)
  3. Reboot

Or run this PowerShell command as administrator and then reboot:

Enable-WindowsOptionalFeature -FeatureName "Containers-DisposableClientVM" -All -Online

Then create a sandbox config, which downloads and installs the latest version of NetworkMiner every time the sandbox is started, by creating a file called “NetworkMinerSandbox.wsb” with the following contents:

<Configuration>
  <MappedFolders>
    <MappedFolder>
      <!-- Replace path below with your PCAP dir -->
      <HostFolder>C:\Users\Erik\pcap</HostFolder>
      <ReadOnly>true</ReadOnly>
    </MappedFolder>
  </MappedFolders>
  <LogonCommand>
    <Command>cmd.exe /C "curl -L https://www.netresec.com/?download=NetworkMiner | tar -C C:\Users\WDAGUtilityAccount\Desktop\ -xf -"</Command>
  </LogonCommand>
</Configuration>

Note: Replace “C:\Users\Erik\pcap” with whatever location your capture files are at

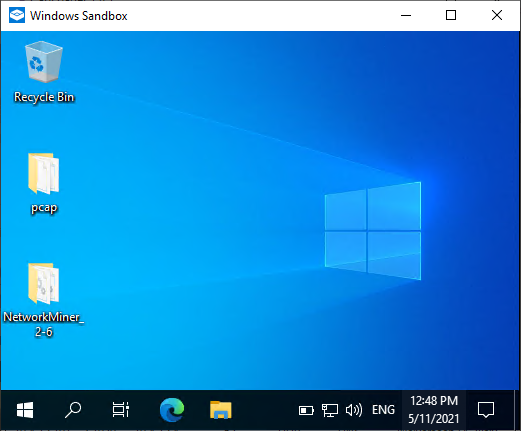
After starting NetworkMinerSandbox.wsb you’ll have a fresh Windows machine up and running within a couple of seconds. The latest version of NetworkMiner and your PCAP dir are both accessible from the sandbox’s desktop.

Windows Sandbox

Image: NetworkMiner 2.6 installed in a clean Windows Sandbox environment

Moving files in or out of the sandbox is just a matter of copy and paste (Ctrl+C / Ctrl+V).

VirtualBox and Windows Sandbox

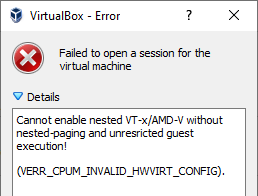
VirtualBox error message Cannot enable nested VT-x/AMD-V without nested-paging and unrestricted guest execution

Are you using VirtualBox to run virtual machines on your Windows host and getting an error message saying “Failed to open a session for the virtual machine”, with details such as “Cannot enable nested VT-x/AMD-V without nested-paging and unrestricted guest execution” or “Failed to get device handle and/or partition ID”, after enabling Windows Sandbox?

Even though Windows Sandbox doesn’t need Hyper-V it still requires a hypervisor, which unfortunately conflicts with VirtualBox. You can disable the hypervisor by running the following command as administrator:

bcdedit.exe /set hypervisorlaunchtype off

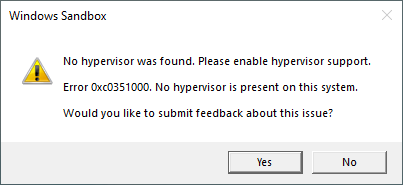
...and then rebooting the computer before starting a VirtualBox VM with “nested VT-x” enabled. Turning off the hypervisor will unfortunately prevent Windows Sandbox from running, giving an error message saying “No hypervisor was found. Please enable hypervisor support.” (Error 0xc0351000)

Windows Sandbox error message No hypervisor was found. Please enable hypervisor support. Error 0xc0351000. No hypervisor is present on this system

To re-enable the hypervisor, in order to run Windows Sandbox again, you’ll need to run

bcdedit.exe /set hypervisorlaunchtype auto

and reboot the host.

Update May 26, 2021

We have now uploaded a simple Windows Sandbox config to our website here:

https://www.netresec.com/?download=NetworkMinerSandbox

This script runs on any Windows Pro machine that has the Sandbox feature active.

Posted by Erik Hjelmvik on Tuesday, 11 May 2021 13:39:00 (UTC/GMT)

Tags: #Netresec#NetworkMiner#PCAP#Windows#Sandbox#Windows Sandbox#Malware

Share: Facebook   Twitter   Reddit   Hacker News Short URL: https://netresec.com/?b=215d5b5


Remote Packet Dumps from PacketCache

PacketCache logo

This blog post describes how to dump a packet capture (pcap file) on a remote computer, which runs the PacketCache service, and retrieve that pcap file using only PowerShell.

PacketCache is a free Windows service that continously sniffs network traffic on all interfaces (Ethernet, WiFi, 3G, LTE etc) and maintains a cache of the most recent traffic in RAM. This enables incident responders to read PCAP data out of a PC's PacketCache, for example when an IDS or anti-virus alerts on something potentially malicious. Unfortunately, there is no central management tool for PacketCache, which means that the PCAP data has to be dumped locally at the PC that triggered the IDS or AV alert.

There are a few workarounds "hacks" available to solve this problem, but the most elegant solution is to leverage PowerShell Remoting / WinRM in order to trigger a remote PacketCache instance to create a PCAP file and then copy the PCAP file through the same PowerShell session. To make things even simpler we've created a PowerShell script that can be used to download a PCAP file from any machine running PacketCache. Okay, maybe not *any* machine, the script only works on PCs that you have admin credentails for. Nevertheless, here's how you run the script from a PowerShell prompt:

PS C:\> .\ReadRemotePacketCache.ps1 DESKTOP-LT4711 Administrator
[*] Dumping PacketCache at DESKTOP-LT4711
[*] Copying PCAP dump from DESKTOP-LT4711
[*] Remote PacketCache data saved to DESKTOP-LT4711_181112_1337.pcap
PS C:\>

The ReadRemotePacketCache.ps1 script can be downloaded from the PacketCache product page.


Configuring Hosts for PowerShell Remoting

If you have not previously set up your environment for PowerShell remoting, then you will need to follow these steps before invoking the "ReadRemotePacketCache.ps1" script as above.

On the remote PC, start PowerShell as administrator and enable PowerShell remoting with the "Enable-PSRemoting" command as shown here:

PS C:\> Enable-PSRemoting -SkipNetworkProfileCheck -Force
WinRM has been updated to receive requests.
WinRM service type changed successfully.
WinRM service started.

WinRM has been updated for remote management.
WinRM firewall exception enabled.
Configured LocalAccountTokenFilterPolicy to grant administrative rights remotely
to local users.

PS C:\>

Configuring TrustedHosts for Workgroups

You will also need to set up a trust relationship between the local and remote host. If the remote PC is member of an Active Directory domain, then this trust is already in place. However, if you're in a workgroup or the computers are not in the same domain, then you will need to set the TrustedHosts item like this on both the local PC and the remote PC:

PS C:\> Set-Item WSMan:\localhost\Client\TrustedHosts [IP or Hostname of the other PC]
PS C:\> Get-Item WSMan:\localhost\Client\TrustedHosts
PS C:\> Restart-Service WinRM

Note: if you need to dump PacketCache data from several remote hosts, then you can replace the IP/hostname with '*' to trust any PC or supply a comma separated list of individual hostnames or IPs to trust.

If you've configured TrustedHosts correctly, then you should be able to run the "ReadRemotePacketCache.ps1" script as shown previously. However, if the remote PC isn't in TrustedHosts, then you'll most likely get an error message like this:

PS C:\> .\ReadRemotePacketCache.ps1 10.0.13.37 Administrator
New-PSSession : [10.0.13.37] Connecting to remote server 10.0.13.37 failed with the following error message : The WinRM client cannot process the request. If the authentication scheme is different from Kerberos, or if the client computer is not joined to a domain, then HTTPS transport must be used or the destination machine must be added to the TrustedHosts configuration setting. Use winrm.cmd to configure TrustedHosts. Note that computers in the TrustedHosts list might not be authenticated. You can get more information about that by running the following command: winrm help config. For more information, see the about_Remote_Troubleshooting Help topic.

Automating Remote Artifact Collection

With PowerShell remoting in place you're not limited to just dumping packets from a remote PacketCache service, you can also dump the RAM or copy individual files from the remote computer. This comes in handy in order to implement an automated evidence/artifact collection, for example when a high-severity alert is received by your SIEM.

There are frameworks in place that can help with aquisition of memory and files, such as Matthew Green's Invoke-LiveResponse tool, which can dump memory with WinPMEM and leverage PowerForensics to enable remote raw disk access. Some organizations even start sniffing packets at events like this, but this will only capture the traffic from after a potential compromize. This is where PacketCache comes in, since it can allow you to retrieve packets ranging back as far as a couple of days before the alert.


Credential Theft

It is recommended to use unique passwords for each local account with administrator rights. This practice is extra important if you plan to log into a potentially compromized host using administrator credentails, as described in this blog post. You might also want to lock down the local admin accounts even further in order to minimize the consequences of the admin credentials falling into the wrong hands. See Microsoft's articles on "Local Accounts" and "Attractive Accounts for Credential Theft" for more recommendations regarding how to secure local admin accounts.


PacketCache is Free

CC BY-ND PacketCache is free to use, even commercially. It is released under a Creative Commons Attribution-NoDerivatives 4.0 International License, which means that you can copy and redistribute PacketCache in any medium or format for any purpose. You can download PacketCache here:

https://www.netresec.com/?page=PacketCache

The PowerShell script presented in this blog post is also shared under the same CC license and can be downloaded from the PacketCache product page.


Credits

I'd like to thank Dick Svensson for suggesting the use of PowerShell Remoting to read PacketCache data remotely!

Posted by Erik Hjelmvik on Wednesday, 14 November 2018 08:00:00 (UTC/GMT)

Tags: #Netresec#PCAP#PowerShell#PacketCache#Windows

Share: Facebook   Twitter   Reddit   Hacker News Short URL: https://netresec.com/?b=18B9747


PacketCache lets you Go Back in Time

PacketCache logo

Have you ever wanted to go back in time to get a PCAP of something strange that just happened on a PC?
I sure have, many times, which is why we are now releasing a new tool called PacketCache. PacketCache maintains a hive of the most important and recent packets, so that they can be retrieved later on, if there is a need.

Network forensics and incident response is performed post-event, but requires that packet have already been captured during the event to be analyzed. Starting a network sniffer after a suspected intrusion might provide useful insight on what the intruders are up to, but it is much better to be able to go back in time to observe how they gained access to the network and what they did prior to being detected. Many companies and organizations combat this problem by setting up one or several solutions for centralized network packet capturing. These sniffers are typically installed at choke-points on the network, such as in-line with a firewall. However, this prevents the sniffers from capturing network traffic going between hosts on the same local network. Intruders can therefore often perform lateral movement on a compromised network without risk getting their steps captured by a packet sniffer.

Logo for Back to the Future series logo - public domain

USB broadband modem, credit: Game Gavel (cc-by-sa-3.0)
Image by Game Gavel
We're now trying to improve the situation for the defenders by releasing PacketCache, which is a free (Creative Commons licensed) Windows service that is designed to continuously monitor the network interfaces of a computer and store the captured packets in memory (RAM). PacketCache monitors all IPv4 interfaces, not just the one connected to the corporate network. This way traffic will be captured even on public WiFi networks and Internet connections provided through USB broadband modems (3G/4G).

By default PacketCache reserves 1% of a computer's total physical memory for storing packets. A computer with 4 GB of RAM will thereby allow up to 40 MB of packets to be kept in memory. This might not seem like much, but PacketCache relies on a clever technique that allows it to store only the most important packets. With this technique just 40 MB of storage can be enough to store several days worth of “important” packets.

The “clever technique” we refer to is actually a simple way of removing packets from TCP and UDP sessions as they get older. This way recent communication can be retained in full, while older data us truncated at the end (i.e. only the last packets are removed from a session).

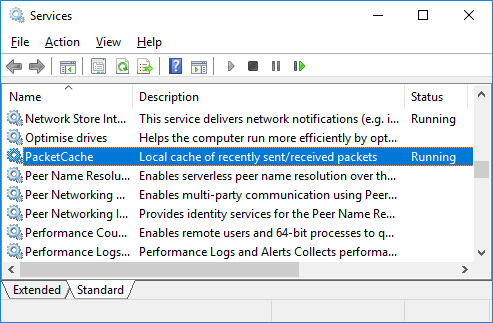
PacketCache services in services.msc

To download PacketCache or learn more about this new tool, please visit the official PacketCache page:
https://www.netresec.com/?page=PacketCache

PCAP or it didn't happen!

Posted by Erik Hjelmvik on Wednesday, 28 September 2016 11:45:00 (UTC/GMT)

Tags: #PacketCache#PCAP#NSM#forensics#Windows#sniffer#memory#DFIR

Share: Facebook   Twitter   Reddit   Hacker News Short URL: https://netresec.com/?b=169d0d2

X / twitter

NETRESEC on X / Twitter: @netresec

Mastodon

NETRESEC on Mastodon: @netresec@infosec.exchange